Guides
How to sew an elastic waistband
Two methods: a casing you thread the elastic through, or elastic stitched straight to the fabric. The casing is easier and the direct method is flatter - here is both, with the settings.
By Michael W. · Published
Disclosure: this page contains affiliate links. As an Amazon Associate, StitchStarter earns from qualifying purchases at no extra cost to you. Prices are read from Amazon daily and dated; the price you pay is the one Amazon shows at checkout. It never changes which machines we recommend. Full disclosure.
Quick picks
The short answer. Every pick is explained in full below, including who should skip it.
| # | Product | Best for | Score | Price |
|---|---|---|---|---|
| 1 | 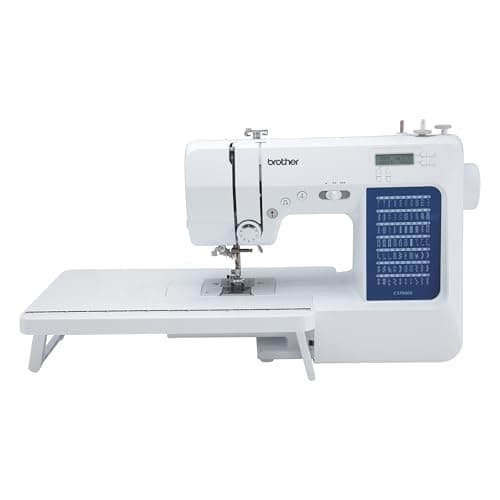 Brother CS7000XA proper stretch stitch and a speed slider for controlled stretching. | Best machine for elastic | 8.2 | |
| 2 | 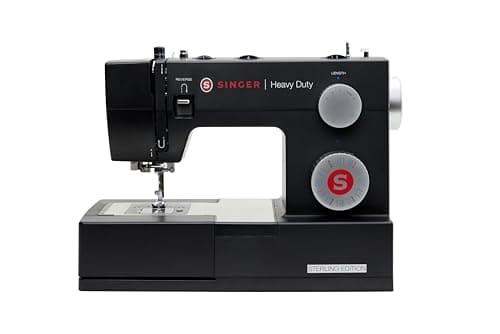 Singer Heavy Duty 4432Dedicated stretch stitches on a metal-framed machine. | Best if you sew elastic often | 7.6 | |
| 3 | 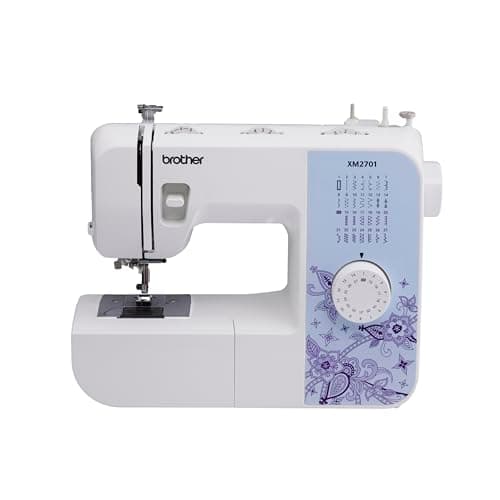 Brother XM2701A three-step zigzag is all this job really needs. | Best budget option | 7.3 |
Prices shown are Amazon prices as of November 1, 2026 and can change.Scores are our editorial judgment on six axes, explained on the methodology page. We do not run a test lab and never claim to.
There are two ways to sew an elastic waistband, and picking the right one is most of the job. The casing method — fold the top of the fabric over, stitch it down to make a tunnel, thread elastic through — is easier, more forgiving and the right choice for pajama pants, simple skirts and anything a beginner is making for the first time. The direct method — stitch the elastic to the fabric with a zigzag while stretching it — gives a flatter, more professional waistband and is what you want on knits and activewear.
Both come down to the same two numbers: how much elastic to cut, and which stitch to use. Get those right and neither method is difficult.
How much elastic to cut
Measure the body where the waistband will sit — not the garment — then cut the elastic a little shorter than that measurement, plus overlap for joining. Most sewers take off about 2 to 5 cm (roughly 1 to 2 inches) depending on how firm the elastic is and how snug you want it, and add 2.5 cm (1 inch) for the overlap.
The honest method is better than any formula: cut it long, pin the ends together, and try it on around the waist over the clothing you will wear it with. Elastic varies enormously in how much it recovers, so a number that works for one brand is wrong for another. Trim, re-pin, try again. Two minutes here saves remaking the waistband.
Which stitch, which needle, which elastic
The settings for each method. A straight stitch directly on elastic will snap the thread - this is the single most common mistake.
Method one: the casing
1. Finish the raw top edge. A zigzag along the raw edge, or fold a small turn under. This stops the inside of the casing fraying.
2. Fold the top down by the width of your elastic plus about 1cm, and press. Pressing is what makes this neat — pinning an unpressed fold never comes out even.
3. Stitch close to the lower folded edge, all the way round, but leave a 5cm gap. That gap is where the elastic goes in. Backstitch at both sides of it.
4. Thread the elastic through with a safety pin or a bodkin on one end. Pin the other end to the fabric outside the casing so it cannot disappear inside — everybody does this once.
5. Overlap the ends by 2.5cm and stitch them together securely. A box of straight stitching, or several rows of zigzag. This joint takes all the load.
6. Ease the elastic inside, distribute the gathers, and stitch the gap closed.
7. Optional but worth it: stitch through the casing at four points. Front, back and both sides, sewing through fabric and elastic with a short zigzag. This is what stops the elastic rolling and twisting inside the casing — the single most common complaint about this method.
Method two: elastic stitched straight to the fabric
1. Join the elastic into a loop first. Overlap 2.5cm and stitch securely.
2. Mark the elastic and the fabric into quarters. Pins at front, back and both sides on each. This is how you distribute the gathers evenly instead of ending up with all of them at the back.
3. Pin the elastic to the wrong side of the fabric, matching quarter marks. The fabric will be much bigger than the elastic. That is correct.
4. Sew with a three-step zigzag, stretching the elastic to match the fabric as you go. Hold the fabric behind the foot with one hand and stretch the section in front of the foot with the other, so the quarter you are sewing lies flat. Do not pull the fabric through the machine — let the feed dogs work.
5. Fold the whole waistband to the inside and stitch again. A second row of zigzag or a twin-needle row encloses the elastic and gives the flat ready-to-wear finish.
Machines that handle elastic well
This job needs one thing from a machine: a stitch that stretches. All three have one, and the difference is how much control you get while stretching.
Brother CS7000X
Has a proper stretch stitch among its 70, and the speed slider matters here - stretching elastic while steering fabric is much easier at a controlled pace.
Skip it if You want physical dials instead of a menu, or you will be sewing canvas, upholstery or leather regularly.
Singer Heavy Duty 4432
Dedicated stretch stitches on the metal-framed Heavy Duty platform. The pick if waistbands and knits are regular work rather than occasional.
Skip it if You would only ever use straight and zigzag - the 4423 covers that for less.
Brother XM2701
A three-step zigzag is genuinely all this job requires, and the XM2701 has one. The cheapest honest answer.
Skip it if You already know you will sew every week, or you want speed control and a quilting table.
#ad - buy links go to Amazon and earn us a commission at no extra cost to you. Prices shown are Amazon prices as of November 1, 2026 and can change. Full disclosure.
Five things that go wrong, and why
The thread snaps when the waistband stretches. You used a straight stitch through the elastic. Unpick and use a three-step zigzag or a stretch stitch.
The elastic twists inside the casing. Stitch through the casing at four points, as in step seven above. There is no other reliable fix.
The waistband is too loose after one wear. Braided elastic narrows and tires when stretched repeatedly. Use knitted or non-roll elastic for waistbands and keep braided for casings where it is not stitched through.
The gathers are all in one place. You did not mark quarters. Marking is the whole technique.
The fabric puckers or waves. Either you pulled the fabric through the machine rather than letting it feed, or the stitch length is too short. Our settings for stretchy fabric goes through this properly, and when a machine will not feed fabric covers the feed side.
The picks in full
01 - Best machine for elastic
Brother CS7000X
Does the fiddly parts for you so you can spend your energy learning to sew.
- 70 built-in stitches, 7 one-step buttonholes
- Automatic needle threader, drop-in top bobbin
- Speed-control slider
- Wide table and 10 presser feet included
- Get it if
- You want threading, buttonholes and stitch settings handled by the machine, and you might try quilting later - the wide table is already in the box.
- Skip it if
- You want physical dials instead of a menu, or you will be sewing canvas, upholstery or leather regularly.
The trade-off
A metal internal frame inside a light plastic shell. That makes it easy to carry and quiet on cottons and mid-weights; it is not built for heavy layers every day the way a Heavy Duty is.
How the Brother CS7000X scores
Our judgment on the six axes described on the methodology page. Not measurements - we do not run a test lab.
- Setup and threading
- 9/10
- Everyday stitch quality
- 8/10
- Thick fabric
- 6/10
- Beginner features
- 9/10
- Durability reputation
- 7/10
- Help for this exact model
- 10/10
Overall 8.2/10
02 - Best if you sew elastic often
Singer Heavy Duty 4432
The middle Heavy Duty - more stitches than the 4423, same bones.
- 32 built-in stitches (110 stitch applications), one-step buttonhole
- 1,100 stitches per minute
- Full metal interior frame, top drop-in bobbin
- Automatic needle threader, drop feed
- Get it if
- You want the Heavy Duty platform and will genuinely use stretch and decorative stitches.
- Skip it if
- You would only ever use straight and zigzag - the 4423 covers that for less.
The trade-off
It sews identically to the 4423. The stitch library is the whole difference, and most owners settle on four or five stitches within a month.
How the Singer Heavy Duty 4432 scores
Our judgment on the six axes described on the methodology page. Not measurements - we do not run a test lab.
- Setup and threading
- 7/10
- Everyday stitch quality
- 8/10
- Thick fabric
- 9/10
- Beginner features
- 6/10
- Durability reputation
- 8/10
- Help for this exact model
- 8/10
Overall 7.6/10
03 - Best budget option
Brother XM2701
The find-out-if-I-actually-like-this machine.
- 27 stitches, one-step buttonhole
- Automatic needle threader, drop-in bobbin
- 6 presser feet included
- Light enough to carry to a class
- Get it if
- You are not sure sewing will stick and you want a real, capable machine without spending what a better one costs.
- Skip it if
- You already know you will sew every week, or you want speed control and a quilting table.
The trade-off
Lightweight and basic. It does everything a beginner needs - buttonholes, zippers, hems - but you will outgrow it sooner than the CS7000X.
How the Brother XM2701 scores
Our judgment on the six axes described on the methodology page. Not measurements - we do not run a test lab.
- Setup and threading
- 9/10
- Everyday stitch quality
- 7/10
- Thick fabric
- 5/10
- Beginner features
- 7/10
- Durability reputation
- 6/10
- Help for this exact model
- 9/10
Overall 7.3/10
Questions beginners actually ask
How do you sew an elastic waistband?
Two methods. The casing method: finish the raw top edge, fold it down by the elastic width plus about 1cm, stitch near the lower fold leaving a 5cm gap, thread the elastic through, overlap and stitch the ends, then close the gap. The direct method: join the elastic into a loop, mark both elastic and fabric in quarters, and stitch the elastic to the fabric with a three-step zigzag while stretching it to match.
What stitch do you use to sew elastic?
A three-step zigzag or a dedicated stretch stitch whenever you stitch through the elastic itself. A straight stitch cannot stretch, so the thread snaps the first time the waistband is pulled on. In the casing method the elastic is never stitched through, so a straight stitch is fine for the casing seam.
How much elastic do I cut for a waistband?
Measure the body at the waistband position, cut the elastic slightly shorter - most sewers take off about 2 to 5cm - and add 2.5cm for the overlap. Better still, cut it long, pin the ends and try it on, because elastic varies a lot in how much it recovers between brands.
Why does my elastic waistband twist?
Because the elastic can rotate freely inside the casing. The fix is to stitch through the casing and the elastic at four points - front, back and both sides - with a short zigzag once the elastic is in. That holds it flat and is the only reliable solution.
What kind of elastic is best for a waistband?
Knitted or 'non-roll' elastic for anything stitched through, because braided elastic narrows and tires when stretched repeatedly. Braided elastic is fine inside a casing where it is not pierced by stitching. Widths of 1 to 2.5cm suit most waistbands.
Can a beginner sew an elastic waistband?
Yes - the casing method is one of the first techniques worth learning, and an elastic-waist skirt or pajama pants is an excellent first garment because the waistband removes fitting from the equation entirely.
Read next
- Sewing machine settings for stretchy fabric
- What to sew first
- Sewing machine stitches explained
What the three-step zigzag is actually for.
- Do you need a serger?